Shop-style precision (0°–60°) without the full-size drill press.
They’ve tried to drill a perfectly straight or angled hole by hand and ended up with a wobble, a ruined workpiece, and a string of frustrated expletives. For hobbyists and small-shop users who can’t justify a full-size drill press, repeatable accuracy feels out of reach — until now.
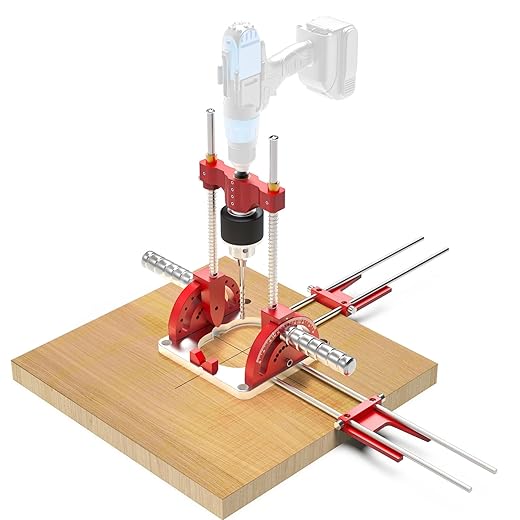
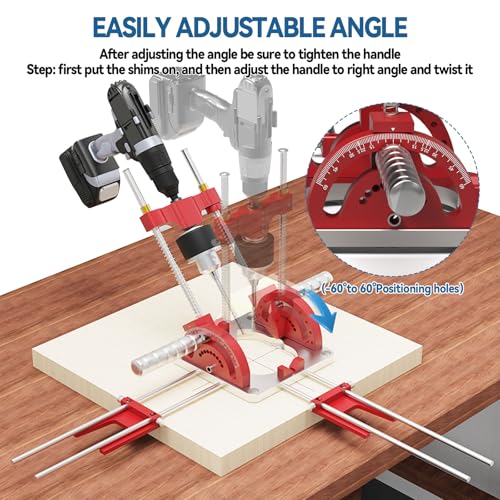
The Multi Angle Drill Guide aims to bridge that gap: a compact, all-metal stand with a calibrated protractor (0°–60°), self-centering chuck base, and depth stop that works with 1.5–13mm bits. It gives shop-style guidance without the bulk or price of a press — though it’s a bit heavy for purely handheld setups (≈2.4 kg) and some users note slightly stiff sliding and a non-reversible chuck operation. For those who need dependable, repeatable holes across wood, metal, and composites, it’s a practical compromise.
Portable Multi-Angle Drill Guide Stand for 1.5–13mm
It delivers dependable, shop-style guidance for straight and angled holes without the bulk or expense of a full drill press. For hobbyists and small-shop users who need repeatable accuracy across wood, metal, and composite materials, it strikes a useful balance between precision and portability.
Overview
The Multi Angle Drill Guide is a portable, metal-bodied drill stand designed to bring repeatable precision to handheld drilling. Built for 1.5–13mm (1/16″–1/2″) straight-shank bits and compatible with most handheld drills and impact drivers, it converts a cordless drill into a controlled vertical or angled drill press. Its range of motion and simple locking system make it a practical tool for woodworking, light metalworking, dowel work, and general home repair tasks.
Key design elements
It emphasizes mechanical simplicity: an aluminum-alloy frame, a drilled base with mounting and centering features, a quick-release angle adjustment with locking pins, and a chuck centering collar to guide the drill shank. Instead of relying on plastic components, the guide uses metal parts where stability matters—particularly in the sliding columns, angle pivot, and chuck holder.
What’s included and first impressions
When unpacked, the package typically includes the main guide body, the chuck-centering collar, limit/depth stop components, and a set of fasteners. The kit is relatively minimal; it expects the user to provide the drill and drill bits. The parts fit together with machined mating surfaces rather than press-fit plastic, which gives an immediate impression of robustness.
Construction, materials, and fit
The guide is constructed mostly of anodized aluminum alloy and plated steel for load-bearing components. The finish is utilitarian and resists corrosion. Critical surfaces—the slide columns and the pivot—show machining marks consistent with medium-tolerance manufacturing; they are not mirror-smooth, but the tolerances are tight enough for accurate alignment.
Features and advantages
Practical performance
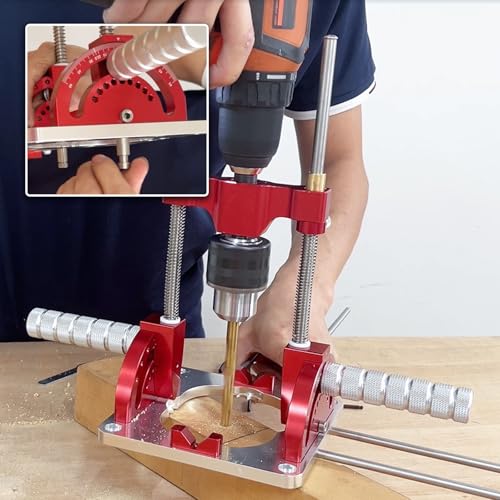
The guide performs best when used on a stable work surface. For vertical holes the self-centering guide and depth stop enable consistent results on repeated operations such as dowel holes or pocket dowels. At angles, the calibrated scale is simple to set and the locking handles clamp solidly when properly tightened. Users converting a cordless drill into a small drill press will find the straightness of travel markedly better than freehand drilling.
A few practical notes on performance:
Compatibility and typical uses
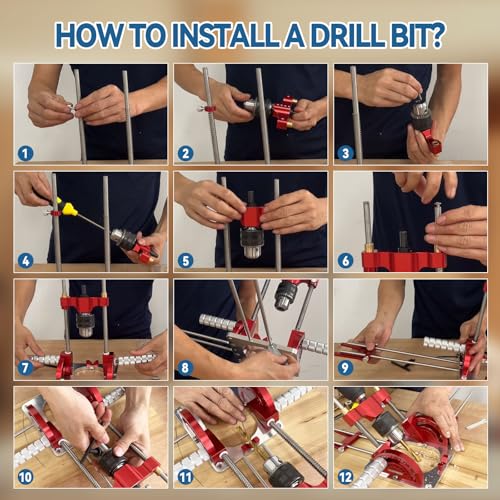
Setup and step-by-step use
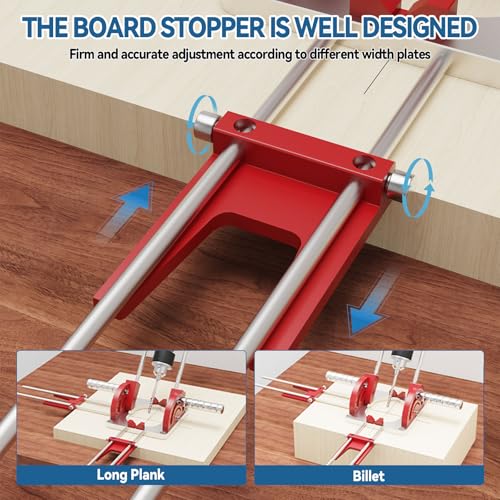
- Mount the base to a stable surface or clamp it to a sacrificial board for portable use.
- Insert the drill into the chuck-centering collar and tighten the drill’s chuck to hold the bit.
- Select the required angle on the protractor scale, disengage the quick-release pins, set the angle, and re-engage the locks.
- Set the depth stop to limit drilling depth for repeatable holes.
- Drill with a steady feed, keeping the drill collinear with the guide to avoid side-loading the bits.
Maintenance and care
Quick specification table
| Attribute | Detail |
|---|---|
| Compatible bit sizes | 1.5–13 mm (1/16″–1/2″) |
| Angle range | 0°–60° |
| Material | Aluminum alloy body, steel hardware |
| Typical weight | ~2.42 kg |
| Primary uses | Woodworking, dowel work, light metal fabrication |
Tips to get the best results
Who benefits most from this tool?
This guide is aimed at hobby woodworkers, small-shop fabricators, and DIYers who want better control than freehand drilling without investing in a full-size drill press. It’s also useful for professional tradespeople who need a portable, accurate drilling aid on site.
Final assessment
The Multi Angle Drill Guide offers a pragmatic combination of accuracy, portability, and solid construction. It is not a replacement for a heavy-duty drill press when large workpieces or very high torque are involved, but it reliably elevates the quality of handheld drilling, especially when repeatability and angle accuracy matter. With routine maintenance and the right clamping practices, it becomes a dependable extension of a workshop’s toolset.
FAQ
It cannot fully replace a dedicated drill press for heavy-duty, high-torque, or very deep drilling tasks, but it provides drill-press-like control for most light to medium woodworking and metalworking jobs, especially when the base is clamped to a bench.
The guide is designed to accept straight-shank drill bits from 1.5 to 13 mm and to hold a standard handheld drill in the centering collar. Users should check their drill’s body shape and chuck size—some compact impact drivers with uncommon housings may require an adapter or a different mounting approach.
Angle adjustments use a calibrated protractor and quick-lock pins; accuracy is generally good for joinery and jig work. For precision critical work, clamp the base, tighten the locks fully, and verify with a square or protractor after setup.
Yes—light to medium metal drilling is possible, but users should clamp the base and use appropriate cutting fluid and pilot bits. Avoid trying to bore large-diameter or deep holes in thick steel without proper machinery, as the handheld drill’s torque and bit heat buildup become limiting factors.
Use the adjustable depth-stop feature for depth control and the base’s mounting holes or shop-made jigs for consistent spacing. For round stock, the V-notches and self-centering pins make aligning centers quick and repeatable.
Common issues include sticky/sluggish slide movement and minor play at the chuck holder. A light lubricant on the sliding columns, occasional tightening of fasteners, and ensuring the base is clamped will resolve most issues. If the chuck collar binds, check for metal shavings or burrs and clean the mating surfaces.

Five stars for portability, three stars for instructions. Also small heads-up: the base is metal and a bit heavy — which is good for stability but surprised me when I first unpacked it.
On the bright side, the centering feature literally made drilling aligned dowel holes painless. 😂
Thanks for noting the base weight, Fiona. We’ll add a note about the material in the product summary.
Ha, same here — thought it would be plastic. The extra weight is nice when clamped down.
Did you have to oil or maintain any parts out of the box?
Nope, out of the box it was ready. I wiped it down and tightened a couple of screws, but nothing major.
Short pros/cons from my side:
Pros:
– Lightweight and portable
– Easy to set common angles
– Chuck centering is handy
Cons:
– Not a substitute for a heavy-duty press on thick metals
– Instruction booklet could be clearer
If you’re doing fine woodworking or light metalwork, it’s a solid tool to have in the toolbox.
Would love a video demo of the assembly and angle locking. The photos don’t show the steps clearly.
Thanks Tom — that’s a concise summary. We noted the same about the manual; a clearer guide would be helpful for newcomers.
I liked the angle markings but found them slightly fiddly to lock perfectly. Once locked, though, the accuracy is really good for the price.
Honestly, I think it’s a clever product. For anyone on the fence: think of it as a precision helper rather than a full replacement for a drill press. Saved me space and money.
PS: the 0° setting is dead-on, but at higher angles (45–60°) you need more careful clamping and support.
With hardwoods, clamp both the base and the workpiece and take it slow. I used a slower drill speed and it was fine.
How stable is it at 60° on hardwoods? I’m planning angled shelf brackets.
Spot on, Naomi. It’s designed to complement, not replace, a full drill press.
Bought this for small restoration projects. It cut my setup time down compared to freehand drilling. The 0°–60° range covers most odd angles I need. Price is decent for what it offers.
We recommend marking common angle positions on a scrap piece for faster repeat adjustments.
Nice — thanks! That sounds convenient.
That’s great to hear, Sarah. Glad it’s saved you time on restorations.
How easy is it to switch from straight to angled holes? Does it require removing the drill each time?
You don’t have to remove the drill. Just loosen the locking mechanism, set the angle, and retighten. Takes a minute once you’re used to it.
I have some nitpicky thoughts. The plating on the guide showed tiny blemishes on mine, but nothing that affected function. Packaging could be improved to avoid scratches.
Aside from aesthetics, it’s a practical gadget. 👍
Great review — I actually picked one up after reading this. The chuck centering makes a surprisingly big difference for repeat holes. A couple of notes from my experience:
– Works well on softwoods and thin aluminum.
– Takes a bit of patience to set the angle accurately the first few times.
Overall, worth the £77.99 if you need portability and don’t want a full-size press.
How long have you been using it? Any wobble with larger drill sizes (10-13mm)?
I’ve used it for about 2 weeks. Some slight wobble with 13mm on steel, but it’s fine for wood and softer metals — steady enough if you clamp well.
Thanks for the hands-on feedback, Emily. Good tip about the learning curve on setting angles — we found the same when testing.
Price feels reasonable, but shipping from Amazon added a few days. FYI for UK buyers — watch for delivery times if you’re on a deadline.
Good logistical point. We try to list merchant and availability details, but delivery times can vary.
I ordered prime and got it quickly. YMMV.
Honestly, I was skeptical at first — ‘turn a hand drill into a mini drill press’ sounded like marketing fluff. But after trying it, the center chuck guide and angled stops are legitimately useful. Portability > big machine for my garage projects.
Sacrificial board trick is a life saver. Also tighten the drill chuck fully — small vibrations otherwise.
Clamp the base and the workpiece separately. I also put a small sacrificial board under the piece for cleaner exit holes.
Good practical tips from everyone. We should add a clamping section to the article for users who want more setup guidance.
Anyone tried it on composites? Thinking about using it for a carbon fiber hobby build.
Do you have tips on clamping? I’m worried about the drill slipping.
Glad you found it useful, Marcus. The product aims to balance precision with portability, which seems to be its sweet spot for hobbyists.
I use it for model making and small furniture pieces. The only gripe is the locking screw can strip if you over-tighten. Otherwise a fantastic little jig.
Thanks, good tip. I was worried about stripping too.
Yeah, low-strength threadlocker worked well for me. Just don’t use something permanent.
Would a dab of threadlocker (low strength) help prevent loosening without over-tightening?
Good warning — gentle hand on the locking screw is wise. We’ll highlight torque guidance in the article.
Question: does anyone know if the 1.5–13mm chuck range is fully compatible with SDS or is it strictly standard chucks? I’m considering using an adapter.
The guide is designed for standard chucks that accept round shanks. SDS adapters are generally not recommended because they change the shank profile and seating — that can affect centering and stability.
Bought this for hobby metalworking. Quick report:
1) Use proper drill bits for metal and slow speed.
2) Clamp everything. Seriously, everything.
3) For repeatability, mark the angle stop with a permanent marker.
It won’t replace a proper mill, but for light jobs it’s excellent.
Exactly. And patience. 🙂
Great actionable tips, Anna. We’ll incorporate a metalworking checklist in an update.
Cobalt bits + cutting oil = lifesaver for stainless.
Stainless is tougher — doable for small holes if you use cobalt bits and low speed, but expect more wear.
Do you think it handles stainless steel for small holes (up to 6mm)?
LOL the first time I used it I accidentally drilled at a weird angle because I hadn’t tightened the clamp — ended up with a decorative ‘abstract’ hole. 😂 Lesson learned: double-check before drilling!
Seriously though, it’s a handy tool and makes small projects much less frustrating.
Been there. Second clamp is your friend.
Haha, we’ve all had one of those abstract moments. Thanks for sharing — glad it turned into a positive in the end.