Why I Wrote This Guide and What to Expect
One quick dunk in saltwater can wreck a smartwatch faster than you think. I learned that the hard way when my watch stopped responding after a swim. Calm, methodical action saved it — not magic. In this guide I share the exact steps I took, from immediate moves to careful cleaning, drying, testing, and prevention.
This is a hands-on playbook for people who want realistic expectations: some devices are beyond repair, but many come back with the right approach. I focus on safe, practical techniques I actually used, plus troubleshooting when things didn’t go as planned. Read on to follow my process and give your smartwatch the best chance of survival. I’ll keep technical steps clear and easy to follow.


Immediate Steps I Took Right After Saltwater Exposure
Power off and resist the urge to test it
The first thing I did was force myself not to press any buttons. I powered my watch off immediately — if it was already dead, I left it that way. Turning it on to “see if it works” is how you invite short circuits. I learned that lesson the hard way watching a faint spark under the display on an older device.
Remove straps and external accessories
I snapped off the silicone band and any adapters (magnetic chargers, slide-on cases). Leather or fabric straps trap salt and hold moisture against the case, accelerating corrosion. Quick tip: on an Apple Watch or Samsung Galaxy Watch, the quick-release mechanism makes this fast; some sport watches (Garmin Fenix, Suunto) may need a small screwdriver.
Shake, blot, but don’t submerge or blow with heat
I gently tilted and shook the watch to dislodge beads of water from crevices, holding it face-down over a towel. Then I dabbed visible droplets with a microfiber cloth — no paper towels, which shed fibers. I avoided compressed air and hairdryers; heat can warp seals and push salt deeper.
Check for removable cards or trays
If your watch has a SIM or microSD tray (some LTE models do), I removed it right away and dried the tray separately. If the tray is sealed or requires special tools, don’t force it — leave it to later cleaning or a professional to avoid breaking water seals.
Move to a shaded, dry spot
I carried the watch to my car’s shaded interior and laid it on a towel in a ventilated spot. Direct sun speeds drying but risks overheating electronics; shade and airflow are best. If you have silica packs or the 1kg Orange Self-Indicating Silica Gel Beads Tub handy, grab them for the next stage of drying. These steps buy you time and prevent early damage before deeper cleaning begins.
Safe Disassembly and Careful Inspection Before Cleaning
Respect warranties and know your limits
Before prying anything, I checked my watch’s manual and warranty terms. Some models (Apple Watch, many Garmin and Samsung variants) have glued displays or tamper stickers — opening them can void coverage. I aimed for partial, reversible disassembly: remove straps and back plate screws if accessible, but avoid breaking seals unless necessary.
Tools I used
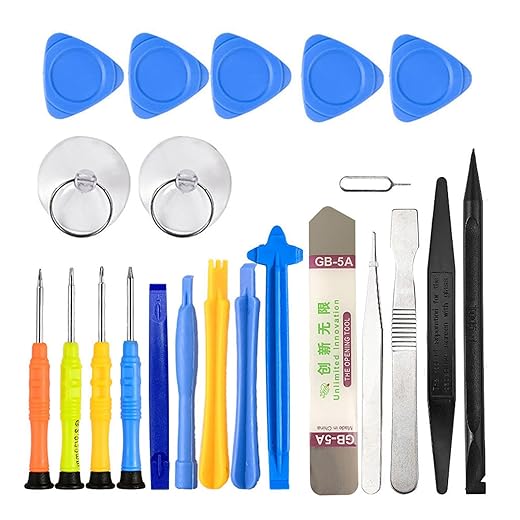
I gathered a small kit: precision screwdrivers (Phillips #00, Torx T3 on some sport models), plastic pry tools, ESD-safe tweezers, a loupe, and lint-free microfiber cloths. For small parts I used a magnetic parts tray and labeled masking tape to keep track.
Step-by-step inspection I performed
Handling tiny screws and adhesive safely
I worked under a bright lamp and used a loupe for visibility. I photographed each step and taped screws to a notebook in the order I removed them — that single photo saved me when reassembling. If a seal looked factory-glued, I stopped; forcing adhesive can warp the case and let moisture deeper.
Signs corrosion is already underway (and when to stop)
Look for green/white crust on contacts, pitted or flaking metal, blackened circuits, swollen battery, or brittle plastics. If corrosion has reached the battery, sensors, or layered PCBs, I chose professional service rather than DIY.
With the inspection complete and my parts documented, I was ready to move into the careful cleaning steps that followed.
How I Cleaned Salt Residue and Corrosion Safely
Rinse vs. wipe: start gentle
My first rule was to remove bulk salt without abrasive action. For light exposure I used a gentle fresh-water rinse (distilled if available) to dissolve crystals, then patted areas with a lint-free cloth. I avoided vigorous scrubbing — salt does the damage, and rubbing can grind grit into coatings.
What I used: water, isopropyl, and a mild soap option
I trusted two cleaners: fresh water to dissolve salts, then isopropyl alcohol (90%+ ideal; 70% if that’s all I had) to displace moisture and help dissolve residues. For stubborn greasy grime a single drop of mild dish soap (think Dawn) in about 100 ml water did the trick — very dilute.
How I handled sticky crusts without scrubbing
Cleaning contacts, sensors, speaker meshes, and buttons
Safety notes: order, liquids, and preserving seals
Keeping the approach deliberate and minimally invasive saved finishes and prevented further electrochemical damage. Next I moved into the drying techniques that really sealed the recovery.
Effective Drying Methods I Used — From Gentle to Intensive
After cleaning, drying correctly was the step that actually saved the watch. I moved methodically from passive to more active techniques so I wouldn’t force moisture into tiny gaps.
Blotting and air-drying (gentlest)
I began by blotting remaining damp spots with a lint-free microfiber and letting the watch sit in a dry, ventilated spot with the band removed and screen facing up at a slight angle so water could escape. For light exposure I left it 12–24 hours; for anything that soaked the ports or crevices I gave it 48 hours before trying anything else. I propped it on a plastic bottle to keep seams open and used a small LED flashlight to check for lingering fog inside the display.
Desiccants like silica gel (safe, effective)
Next I sealed parts in an airtight container with several silica gel packets (3–6 packets in a medium container). Silica pulls moisture without heat and is far more effective than household tricks. For small removed parts (bands, backs) a jar of silica beads dries them in 24–48 hours; for assembled watches I left them 48–72 hours and checked daily.
Controlled low-wattage airflow (gentle active)
A small USB desk fan or a low-speed Vornado-style personal fan directed steady airflow (15–30 cm away) across ports speeds drying without heat. Short, controlled bursts of canned compressed air (15–20 cm away, upright) helped clear speaker meshes and button cavities—never blast continuously.

Warm air carefully (most intensive)
If needed I used warm—not hot—air on low heat: short passes, 30+ cm away, constantly moving, keeping surface temp comfortable to the touch (roughly ≤40–45°C). I avoided hair-dryer max heat or any direct heat gun unless I had a thermometer to control temperature—battery packs and adhesives hate high heat.
Why not rice? Rice absorbs poorly, leaves dust/starch, and can jam ports. I avoided it entirely.
Monitoring: I inspected seams, speaker holes, and under the display with a magnifier and flashlight, and waited at least 48–72 hours before reconnecting or powering on heavier tests.
Testing, Troubleshooting, and What I Did When Things Didn’t Work
After the watch seemed dry, I followed a strict, minimal reconnection routine so I didn’t energize a wet board. I reattached only the battery connector and the display/logic flexes needed to power on, left nonessential modules disconnected, and used the original charger. My first goal was simply: power up without smoke or error indicators.

Step-by-step functional checklist
I ran focused tests and logged results, one function at a time:
Common problems I hit and how I isolated them
When I repaired myself, it was limited to cleaning contacts, reseating flexes, and tiny solder touch-ups using a temperature-controlled iron. For power failures, display delamination, heavy board corrosion, or swollen batteries I engaged a reputable repair shop and prioritized backing up data via the companion app or requesting a memory dump.
Next I moved on to preventative habits and hardware choices that reduced future saltwater risk.
How I Prevented Future Saltwater Damage and Kept My Watch Healthy
I learned that prevention is mostly routines and small choices. These are the practical steps I adopted so every salty swim doesn’t turn into a panic repair.
Pre-exposure preparation
Post-exposure best practices
Regular maintenance I follow
What I pack for day trips
Mindset tips
Stay calm, document the state (photos), and take measured steps — immediate action helps, but patient, consistent care prevents most future headaches.
Next, I’ll wrap up with final thoughts and encouragement.
Final Thoughts and Encouragement
I wrapped up: act fast, don’t power on, flush salt with fresh water, use isopropyl alcohol for contacts, and dry thoroughly with desiccants or gentle heat. Test stepwise and be patient.
Not every device can be saved, but a calm, methodical approach greatly improved my watch’s odds and it came back to life. Try these steps now if a watery mishap happens to you — you might be surprised what quick care can successfully accomplish.

Minor gripe: would be nice to see a photo guide for gasket inspection. Words are great but a few macro shots would save a lot of anxious people from unnecessary disassembly.
Yes! Even a short video clip would be perfect. I’m visual, so pictures help big time.
Fair point — I’ll add photos of gasket checks and what to look for in the next update. Thanks for the feedback.
Noted. If anyone has snapshots they’re willing to share (anonymized), I could add a community gallery section.
Big thanks — loved the step-by-step disassembly tips. I was terrified of cracking the backplate but the guide’s gentle pry technique + the 22-in-1 kit screws helped a ton.
Also: anyone else replace the battery afterward? I swapped in a 410mAh replacement battery and it improved battery life, but I’m wondering if it’s risky to install a non-official pack?
Also note that replacing the battery might void warranty. If your device is still under warranty, consider contacting the manufacturer first.
I had a dodgy third-party battery once — phone died randomly. So yeah, buyer beware.
I installed the 410mAh pack — no issues after 6 months. Just be patient with the adhesive and warm it slightly with the hair dryer to re-seat the connector.
FYI my watch’s battery was swollen after saltwater exposure and the replacement fixed it. But get one with good reviews — cheap fakes are a headache.
Great to hear it helped, Hannah. Third-party batteries sometimes work fine, but check connector alignment and TPU insulation. If you feel any heat or swelling, stop and get an OEM replacement.
Short question: any advice if corrosion has already eaten a trace? Is that end-of-life or salvageable with jumpers?
Tried a jumper once — it worked but was fragile. I eventually replaced the board. Depends on skill level and value of the watch.
If traces are eaten, you can sometimes bridge with micro-wires if you’re comfortable soldering — the 22-in-1 kit is handy, but this is advanced. Otherwise consider pro repair or replacement board.
Long post: I messed up big time. Dropped my watch in the ocean, panicked, and dried it with rice for 12 hours (yes rice, I know 😂). Then I read this guide and used the silica gel tub. Huge difference. The weird part was tiny corrosion spots on the chassis that I treated with the foam brush + contact cleaner. Took me two days to get everything clean.
I also repaired a loose ribbon cable with the 22-in-1 kit; felt like a surgeon. Moral: don’t sleep on silica gel instead of rice. Also, the cleaning kit’s cloth is surprisingly useful for polish.
Thanks for the encouraging tone in the article — made the mess feel manageable.
Your story is my story lol. Rice is fine in a pinch, but silica beads or even a dehydration packet stash is better. The 1kg tub is overkill but worth it.
Totally — the beads are self-indicating too, so you know when to recharge them. Rice never tells you anything 😂
Thanks for sharing the saga, Daniel. Rice is a common stopgap but silica gel is far better at humidity control. Great job on the ribbon cable fix — patience is everything.
Agree on the cloth — also used it to clean dead salt smudges off a charging dock. Works surprisingly well.
FYI for anyone using the silica beads: keep them in an open container with the watch sealed in a small bag so the beads do the work efficiently.
I want to nitpick one thing — when you mention using distilled water, maybe emphasize not to soak the whole watch unless it’s rated for it. A tiny paragraph on risk levels for different IP ratings would be clutch.
Good point, Noah. I tried to keep it practical, but adding a quick IP rating primer makes sense — will update the guide. Short version: avoid submersion if seals might be compromised.
Agreed. My watch said water resistant but the back gasket looked messed up after a dive. Lesson learned the hard way.
Also if you’re unsure, open it up and inspect seals with the 22-in-1 kit before rinsing.
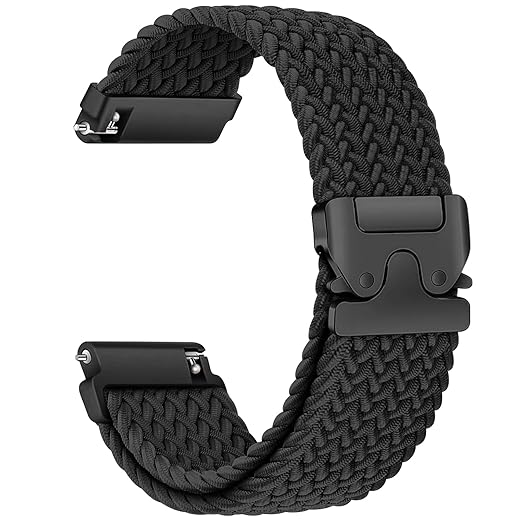
Loved the preventative tips. I bought the braided 22mm strap you mentioned and it dries SO much faster than leather. Small thing but big win for swimmers.
Exactly — breathable straps are underrated. Rinse with fresh water after saltwater swims and let them air out; silica gel in a drawer works great for longer storage.
Constructive feedback: the troubleshooting section could use a quick checklist for ‘won’t turn on’ vs ‘functions but erratic sensor’ — two different causes and fixes. Otherwise, solid guide!
Great suggestion — a compact troubleshooting flowchart for those two scenarios is a good add. I’ll draft that for the update.
Agree. I had an erratic heart rate sensor after a salt splash and it turned out to be corrosion on the metal contacts, not the sensor itself.
Thanks for the example, Noel — I’ll include it as a case study in the checklist.
Short and sweet: followed the whole process, watch works again. Didn’t even need the replacement battery. The contact cleaner really did the trick on the pins. Thx!
Fantastic — glad it was an easy fix. Contact cleaner can save a lot of headaches when corrosion hasn’t eaten the traces yet.
Same here — sprayed the connectors after a salt spill and it booted right up. Just careful with overspray.
Haha the part about trying the hair dryer on low then realizing you had it on full throttle made me laugh. I once melted a strap that way. Pro tip: Revlon 2000W is powerful — use cool air only for electronics!
I learned that after frying a dock cable. Cool setting + silica beads = best combo.
Thanks for the laugh and the reminder. I’ll add a bold note: cool/low heat only, keep distance, and don’t concentrate on one spot.
Random laugh: your line about ‘don’t cry, disassemble’ was too real. I cried, then grabbed the 22-in-1 kit. It was oddly therapeutic fixing tiny screws lol.
Labeling is a pro move. I use a magnetic mat with numbered spots — but tape works in a pinch.
This made my day. I also found that labeling screws with tape reduces reassembly panic.
Happy to provide emotional and practical support 😂. Tiny screws are oddly satisfying when they go back in.
Noticed your tip about reapplying adhesive on the back plate. I used double-sided adhesive strips instead of original glue and it sealed fine. Anyone else tried that?
Thanks — I used thin strips and it’s held up for months so far.
Double-sided adhesive strips can work well if they’re thin and water-resistant. Make sure the edges are flush to keep dust out.
I used a waterproof tape once and regretted it — too thick. Thin adhesive strips are the way to go.
Tbh I skimmed most of it but the parts about prevention and the silica gel tub convinced me to buy a pack. One pro tip: recharge your beads in the oven at low temp instead of buying new ones. Saved money.
Yup I bake mine at 120°C for a few hours. They go from blue back to orange and are good as new.
Exactly, orange ones are my favorite. Less waste too.
Good tip — recharging silica beads works well (follow manufacturer instructions). The self-indicating beads are handy to know when they need recharging.
I’m skeptical of WD-40 on electronics, but the Specialist contact cleaner is legit. Did you test it on coated boards first? Some sprays can remove conformal coating.
Also use in short bursts and let fumes clear; wear gloves if you’re doing a longer clean session.
Yeah I dabbed it on a Q-tip and applied gently — no issues. Just don’t drench the battery area.
Good question. I tested a small area first on an older watch board; the Specialist cleaner didn’t affect conformal coating in my trials, but always test first and avoid prolonged soaking.
This is a super practical guide. Quick tip from me: use the braided nylon strap after any ocean swim. It dries fast and doesn’t stink like rubber. Also, clean the clasp with the contact cleaner occasionally — salt gets in there.
Great practical tip, Grace — cleaning the clasp is easy to overlook but can corrode fast.
Machine wash caution: use gentle cycle and air dry. High heat can warp buckles.
I swapped to a nylon strap and it’s been a relief. Also, washable in the machine if you use a lingerie bag.
Quick note: WD-40 Specialist contact cleaner is amazing for connectors but please warn people to use it in a ventilated area. Smelled like a chemistry lab in my kitchen lol.
This was gold — literally saved my watch after a beach weekend. I followed your immediate steps and used the Three-Step Watch Cleaning Kit first, then silica gel for a couple days. One question: did you ever notice a lingering grainy feeling under the screen after cleaning? 🤔
Glad it helped, Maya! If it’s grainy it might be tiny salt crystals trapped in crevices — try the foam brush from the kit plus a little distilled water and then dry immediately with silica gel. If it persists, a careful disassembly with the 22-in-1 toolkit and blow of contact cleaner can help.
Yep, had that once. Used the tiny spudger from my 22-in-1 kit to pop the bezel and a Q-tip dipped in contact cleaner. Worked like a charm.
If you’re nervous about opening it, at least run the hair dryer on cool and then silica gel for 48h. Saved me when I panicked and didn’t want to void warranty.