A compact M2–M8 tip set with an adapter that removes the fiddly work — but check compatibility first.
Nothing kills momentum like wrestling tiny heat-set inserts into fragile 3D-printed parts. I’ve spent more time filing, misaligning, and reheating than actually assembling projects — and that’s why a simple, reliable tool matters.
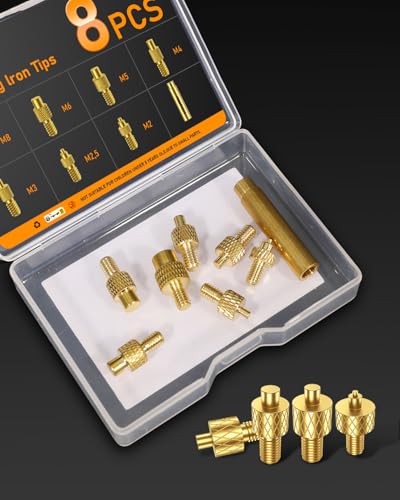
I tried the 8PCS Soldering Iron Tips for Threaded Inserts to see if a purpose-built tip set could stop the fuss. The kit covers M2–M8, uses brass tips with machined knurling for consistent seating, and includes an adapter for common irons — it made most installs fast and repeatable, though very non-standard irons may need a small tweak to fit.
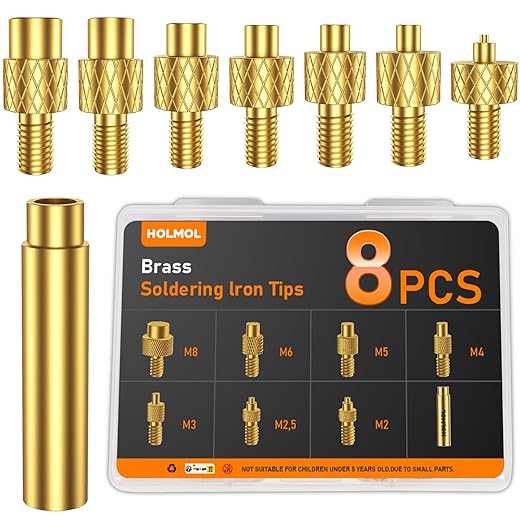
8PCS Heat-Set Insert Soldering Tips M2–M8
I found this set to be a practical, cost-effective way to install a full range of heat-set inserts without fuss. It cuts the fiddly work out of the process for most 3D-printed parts, though very non-standard irons may need a small modification.
Overview
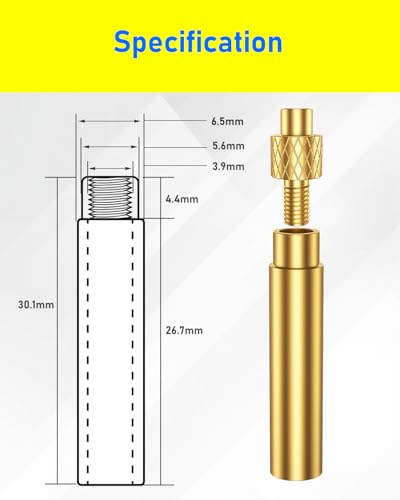
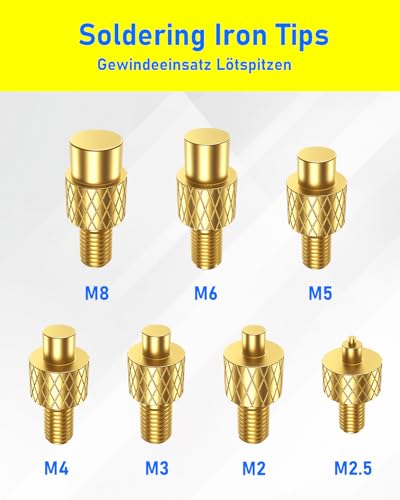
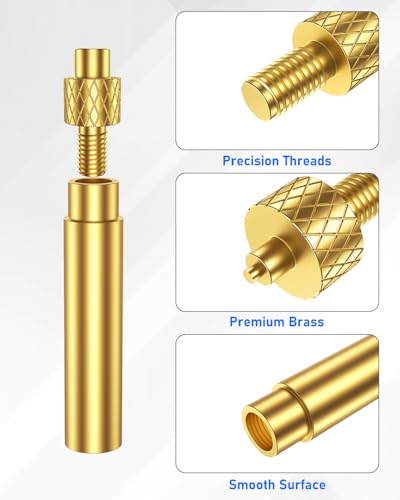
I work with 3D-printed components and small assemblies regularly, and I value tools that reduce setup time and improve repeatability. This 8-piece set of soldering iron tips (M2, M2.5, M3, M4, M5, M6, M8) plus an adapter is designed specifically for installing threaded brass heat-set inserts into thermoplastics. Rather than improvising with conical or chisel tips, this kit gives you a size-specific mating face that centers and heats the insert more predictably.
What’s in the box and first impressions
I was struck by the simplicity: eight brass tips plus a single adapter. The machining is clean, the split-sleeve adapter design is straightforward, and each tip has knurling sized to the corresponding insert. The set is small and light, making it easy to add to a kit drawer or workbench tray.
Compatibility and fit
The adapter is intended to fit irons that use a sleeved tip mount; common compatible models include many Hakko FX-series and several Weller and Yihua irons. In my experience, the fit is excellent on typical temperature-controlled irons that accept threaded or sleeved accessories. That said, if your iron uses a proprietary shaft diameter or a very different mounting method, you might need to machine the adapter or use a shim to achieve a snug connection.
| Item | Notes |
|---|---|
| Adapter style | Split sleeve adapter for common tip mounts |
| Iron compatibility | Works with many Hakko, Weller, Yihua models (check shaft style) |
| Inserts supported | Standard brass heat-set inserts M2–M8 |
How I use them — technique and tips
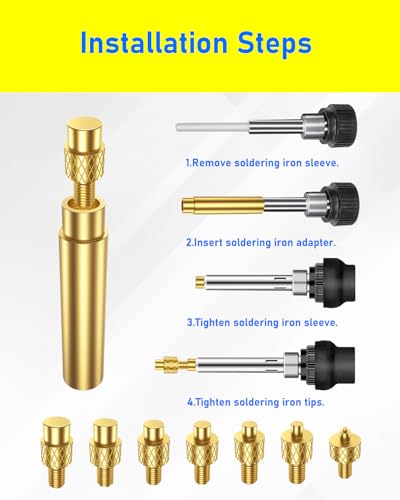
I approach heat-set inserts with a consistent method to avoid over-melting the surrounding plastic and to get a solid seat:
A couple of practical notes from my hands-on use: I prefer heating just long enough to make the insert sit slightly proud, then place the part on a flat heat-resistant surface to level the flange. For fine work I use tweezers to position the insert and a depth stop if repeatable insertion depth is critical.
Performance and durability
The brass tips transfer heat well and resist corrosion. In routine use over several dozen installations across PLA and ABS, I saw consistent results: the knurling helps the insert bite into softened plastic and prevents rotation later. I found no signs of rapid wear on the mating faces after moderate use, and the adapter remained secure on my iron.
Areas I monitor when using the set:
Small issues to be aware of
No product is perfect. A recurring point I’ve encountered is the raised knurled boss on each tool. On smaller sizes the boss is proportionally larger and can potentially touch or slightly melt adjacent plastic edges if you push the insert directly against a thin wall. I remedied this in a couple of cases by lightly chamfering the boss edge with a file to create a small lead-in — a 1–2 minute adjustment per tip.
Another practical limitation is universal fit: if your soldering iron has a non-standard shaft, you may need a shim or a modification. I have seen customers adapt the adapter on a lathe for a perfect fit; for most people no modification is required.

Comparison and value
Compared to improvising with generic soldering tips, this set represents a modest investment that produces more consistent insert seating, reduces part rework, and speeds up repetitive tasks. For the price point, the breadth of sizes covers most use cases for hobbyists and small-scale production. If you frequently install M2–M8 inserts, this kit pays for itself in saved time and fewer failed insert installs.
Final thoughts
I recommend this set for anyone who regularly installs heat-set inserts into 3D-printed or molded thermoplastic parts. It streamlines the process and generally produces cleaner, repeatable results than ad-hoc methods. If you depend on a very specific iron model, double-check shaft compatibility first; otherwise this is a small, durable, and useful addition to a maker or technician’s toolkit.
FAQs
I always check visually: the adapter is a split-sleeve type designed for irons with a sleeved or threaded tip mount. If your iron’s shaft looks similar to common Hakko or Weller tip mounts, there’s a good chance it will fit. For unusual diameters you can use a thin shim or have the adapter lightly bored to size.
Temperatures depend on the plastic. As a rule of thumb, ABS often needs 220–250°C while PLA requires less heat. I start at the lower edge of the recommended range for the plastic and increase only if the insert isn’t seating cleanly. Short bursts with steady pressure produce better results than holding an overheated tip in place for too long.
Yes — the adapter and tips are effectively a way to transfer heat. Some customers have used them for controlled branding or heat shaping. I’d only caution that the tips are sized for threaded inserts, so their contact face is designed for that shape; for other crafts consider whether that geometry suits your application.
I recommend aligning carefully, using the correct tip size, and lowering the iron temperature if the plastic is thin. Chamfering the knurled boss slightly on very small tips can also prevent the tool edge from touching and melting the part. Work quickly and let the part cool before moving it.
Basic upkeep is enough: keep the faces clean of resin or plastic residue and inspect knurling for wear. If residue builds up, gently clean with fine abrasive or a brass brush while the tip is cool. I don’t recommend aggressive grinding as that will change the mating geometry.
They’re fine for light to moderate production. For very high-volume automated processes, purpose-built press or ultrasonic insert machines are a better choice. For small batch production or repeated manual installs, this set offers consistent and affordable performance.

Bought the 8PCS set last week and finally tried them on a couple of PETG parts.
They make installing heat-set inserts so much less fiddly — especially the M3 and M4 tips.
A couple of notes:
1) The M2 tip is tiny, you need steady hands or tweezers.
2) If your iron’s barrel is a bit odd, a light shim/sanding on the tip base helped it sit straight.
Overall, great little kit for £7.59 — good value.
I had the same wobble issue until I wrapped a thin layer of heat-shrink around the iron shaft so the tip seats more snugly. Cheap fix and works well.
Also check your soldering iron temperature — too hot and the plastic can deform, too cold and the insert won’t seat properly. I use ~250°C for PLA and slightly hotter for PETG.
Thanks for the hands-on feedback, Sarah — glad they worked for you. The M2 being small is a common comment; holding the insert with fine-tipped tweezers and warming the plastic a touch before insertion helps avoid tilting.
I’ve used these on TPU and ABS as well as PLA and overall they perform solidly.
The set is lightweight (30 g) and easy to carry in my toolkit.
My only gripe: the M2 tip is fiddly for older hands, you need good lighting and fine tools.
If you’re doing lots of threaded inserts, this set saves time vs heating a screw each time.
Good value for 7.59 GBP — especially if you want a range from M2 to M8.
Totally — for older hands I also use a stand to hold the part steady and a third hand fixture to guide the tip. Makes a world of difference.
Appreciate the detailed use-cases, Linda. For small tips, a magnifying lamp and holding the insert with slanted tweezers makes the job much easier — glad it’s been useful for different filaments.
Mixed feelings. The set installs inserts fine, but on some of my smaller PLA brackets the insert sat a bit loose — maybe my hole sizing was off, or the tip cooled too fast. Anyone else had inserts not hold well after cooling?
Thanks, Priya. Often that’s down to hole tolerance and dwell time. Try drilling a very slightly undersized hole or use a heat-set press with steady pressure for a couple more seconds. Also let the part cool undisturbed — sometimes quick handling leads to a loose fit.
Yep — pre-drill a pilot hole and use a tiny bit of cyanoacrylate (CA) inside for high-load parts. Not always necessary, but for small brackets it helps.
Nice review. Short question though: my iron has a non-standard conical holder — anyone modified these tips to fit? The expert verdict mentioned small modifications, but how invasive are they? I don’t want to ruin the set.
I didn’t modify them, instead I made a little adapter sleeve from copper tube. Might be overkill but saved the tips from being altered.
Good question, James. For conical or unusual iron ferrules, many users only need to file a hairline off the tip base or add a tiny shim (foil or heat-shrink). It’s low-risk if you work slowly and test-fit often. Avoid filing the working end that contacts the insert.
If you’re not confident, try wrapping the ferrule with thin aluminium foil to build up size. No permanent change and surprisingly reliable.
I milled a 0.5mm notch on the base to lock into my iron — took 10 mins and works fine. But yeah, practice on an old tip first.
Okay, confession: I thought these were little screwdrivers at first and spent 10 minutes wondering why nothing unscrewed. 😂
Got over that, and they actually do the job. The tips heat up quickly, insert seating is clean, and cleanup is easy.
Minor rant: the M8 tip is huge compared to my 3D prints — feels like I’m inserting grommets for a submarine.
Also, FYI — they CAN get stuck to the insert if you overheat. Don’t be me and go full forge mode. 😅
Would buy again for the cheap price.
Totally relate. For tiny prints I stick to M2/M2.5; the bigger ones are for functional parts where you need proper thread strength.
Pro tip: press the tip in, then lift slightly while keeping heat so excess plastic forms a neat ring instead of smearing. Prevents sticking.
If a tip sticks, heat it gently and twist rather than yank. Plastic softens and comes away without damaging the tip.
Submarine grommets 😂 I had the same thought with M8. It’s great for big nylon parts but overkill for tiny brackets.
Ha — that made me laugh. Good tip about overheating. If you see plastic bubbling or the insert sinking too deep, lower the iron temp or shorten the contact time. Thanks for the frank review!